
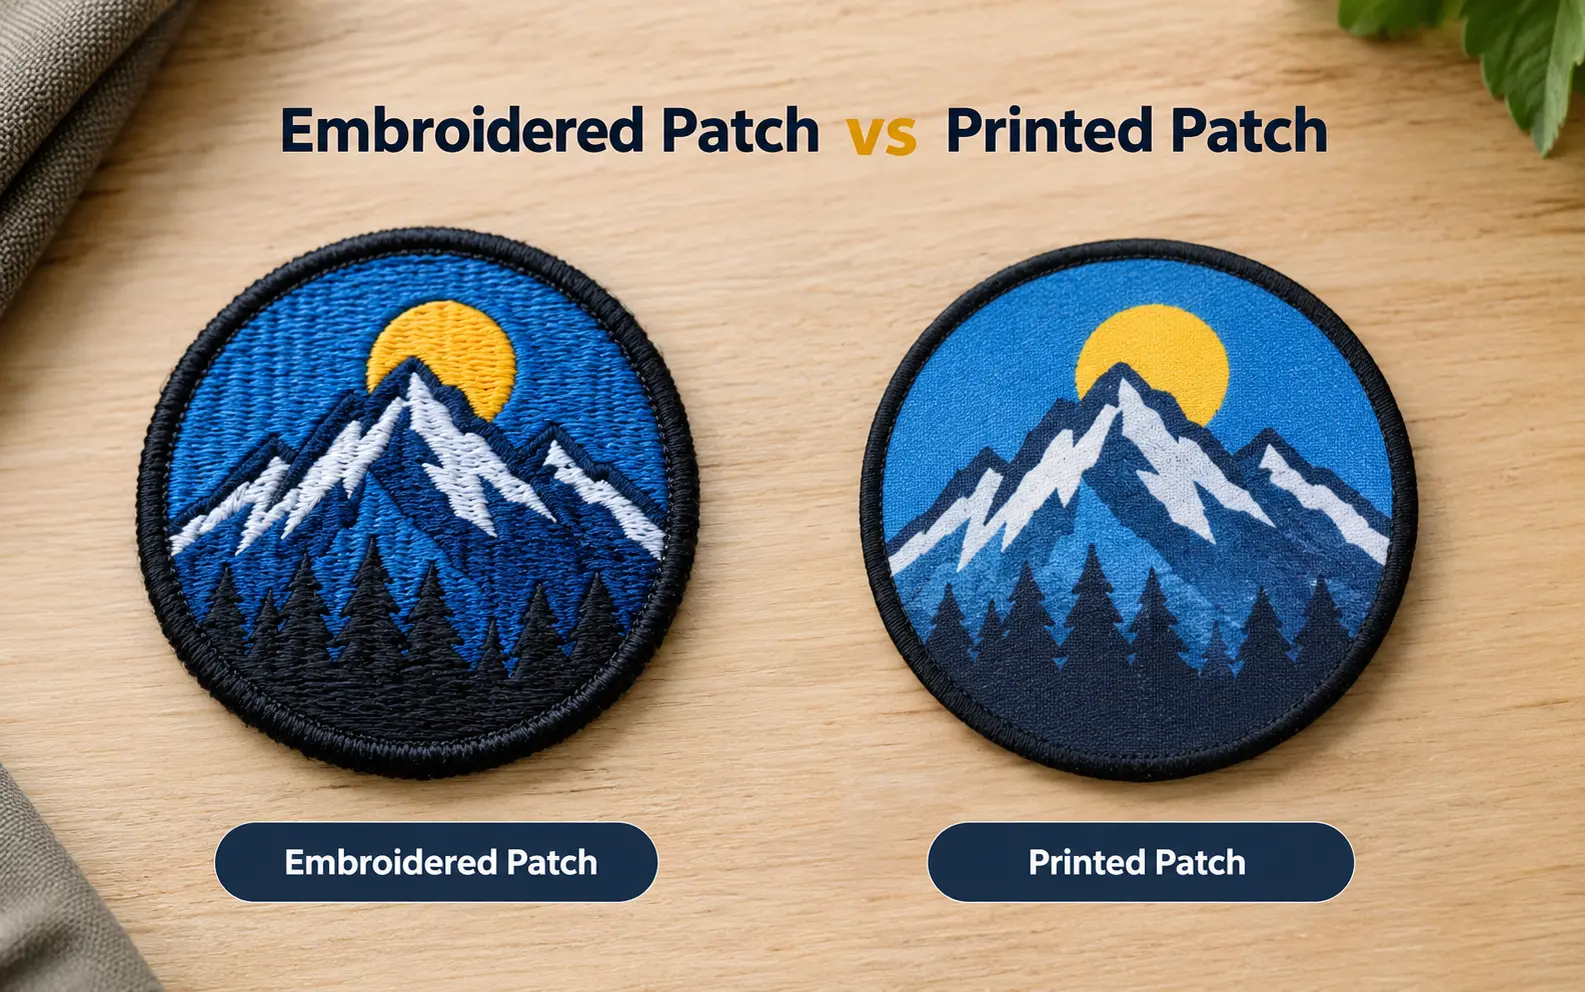
Most people choose a patch type by price, or by whatever they saw on a friend's jacket. Then the first batch arrives and the gradient looks banded, or the "premium" logo looks flat and tired after a month of work shifts.
A few checks on your artwork and on how the patch will be worn settle this in about ten minutes.
An embroidered patch is stitched from thread, so it is raised, tough and best for bold, simple logos. A printed patch has the artwork printed onto a flat surface, so it handles photos, gradients and tiny text, but it wears out faster under heavy abrasion and hot washes. Choose by your artwork first, then by how hard the patch will be used.
"Printed Patch" Is Not One Process
Vendors use the label for at least three different builds, and they age very differently. This is the detail most comparison guides skip, and it explains why you will read "printed patches fade" in one place and "printed patches last years" in another.
- Dye sublimation: Ink turns to gas under heat and sinks into polyester fibers. The color is inside the fabric, so it does not crack or peel, but it needs a polyester base, usually white.
- Direct digital print or film transfer: A layer of ink or film sits on top of the surface. It can work on darker bases, and it is the type most likely to scuff, crack or peel.
- Screen print or vinyl heat transfer: Flat, solid colors laid down one at a time. Good for big runs of simple art, weaker for fine detail.
Before you order, ask the vendor one direct question: which process do you use for this patch? The answer tells you more about durability than any marketing line.
Run the Five-Point Artwork Test
Open your logo file and check these five things. They do most of the deciding for you.
- Count the real colors. Embroidery stays comfortable at roughly 8 to 12 thread colors. Past that, the design gets crowded and the price climbs.
- Measure the smallest text. Thread has physical width. Vendors commonly quote about 4 mm letter height as the floor for stitched text, and about 2 mm for printed text.
- Look for gradients, shadows and glows. Thread can only fake a fade with blended stitching, and it shows as steps. Print renders a smooth blend.
- Check for photos or fine line art. A portrait or a detailed illustration turns into a stitched cartoon in thread.
- Check the background color. Sublimation ink is transparent, so white in the design is just the bare base showing through. A solid black or navy field is hard to print this way and often pushes you toward embroidery.
If your artwork fails two or more of checks 2, 3 and 4, print is the better fit. If it is two flat colors on a dark field, embroidery wins easily.
Where Each Type Actually Fails in Daily Use
Brochure durability claims are not much help. The useful question is what kind of abuse the patch will get, and where that abuse lands.
- Abrasion points: Seat belts, backpack straps and bag handles scrape the same patch spot every day. Thread shrugs this off for a long time. A printed surface dulls and scuffs first.
- Laundry heat: The tumble dryer is the main enemy of printed patches, especially surface transfers. If the garment goes through industrial or rental laundry, as in hospitality, healthcare or trades, embroidery is the safer bet.
- Edges: Printed patches are cut and sealed, and cheaper ones tend to start failing at the edge. A stitched border locks the patch together, so ask what the edge finish is on any printed quote.
- Dye migration: On polyester garments such as sports jerseys, high heat can push the garment's dye into the bare white areas of a printed patch. Test on a hidden spot before you press a whole batch.
- Hook-and-loop storage: Patches with hook backing can snag each other when stacked. Keep them on a loop panel or stored back to back.
What Really Drives the Price
The two types are priced by different things, which is why simple price comparisons mislead.
Embroidery cost follows stitch count, color changes and the density of filled areas. Many vendors also charge a digitizing fee, because someone has to convert your logo into a stitch file. Printing cost follows mostly size and quantity, and extra colors are essentially free.
So a small, simple logo in a small run often costs about the same either way. Print pulls ahead when the design is large and detailed, because a big dense stitched area is slow to sew.
Published vendor prices also contradict each other, sometimes across pages on the same site. Compare like for like by asking every vendor to quote the same things:
- Same finished size and shape
- Same backing type
- Same quantity, plus the next price break up
- Edge finish (merrowed border or sealed cut edge)
- Digitizing or setup fees
- Shipping and turnaround
- Whether a digital proof is included
On quantity, check the next tier before you settle. Ordering 100 can cost less overall than ordering 80.
How Each Feels and Sits on the Garment
Texture is more than a style choice. It changes how the finished garment behaves.
Dense embroidery is stiff. On a thin tee, a knit polo or a stretchy fabric it can pucker around the patch, and the fabric can ripple when you move. Printed patches are lighter and flatter, which suits thin garments.
Neither type stretches, so avoid placing either one across a seam or a high-stretch zone. The inner side matters too. Stitched patches can feel scratchy against skin, so for children's clothing or base layers pick a soft-backed, flat patch.
And remember that backing often matters more than patch type. Iron-on backing does not bond reliably to nylon shells or waterproof fabrics, so use sew-on there.
The In-Between Options Worth Knowing
Not every design fits neatly into one camp, and a few hybrids solve the awkward cases.
- Print plus embroidery: A printed center with a stitched border and lettering. You get photo-style color inside and a locked, durable edge.
- Woven patches: Finer thread than standard embroidery, so smaller text and tighter detail, with a flatter finish.
- PVC patches: A rubbery, raised, waterproof build for gear that lives outdoors.
If your artwork is complex but the patch will take a beating, the hybrid is usually the answer people find too late.
Quick Picks by Situation
| Your situation | Better fit | Watch out for |
|---|---|---|
| Uniform for police, fire, security or trades | Embroidered | Check your agency's patch specification first |
| Full-color mascot or illustration | Printed (sublimated) | Needs a light base; keep it away from hot dryers |
| Corporate logo, 2 to 4 flat colors | Embroidered | Small taglines may need to be dropped or enlarged |
| Corporate logo with a gradient | Printed or print plus embroidery | Dark backgrounds limit your options |
| Biker vest or riding jacket | Embroidered | Sun, rain and wind wear a printed face quickly |
| Limited merch drop or event giveaway | Printed | Cheap edge finishes fray first |
| Thin or stretchy garment | Printed or woven | Embroidery can pucker the fabric |
Test Before You Commit to a Full Run
A sample costs little compared with 500 patches that fail in the wash. Here is a simple routine.
- Order a small run. Ask for 5 to 10 pieces of the exact design, not a stock sample.
- Attach it the real way. Use the same backing on the same fabric as the final garment.
- Wash it five times. Follow the garment's care label, and use the dryer if the garment will be tumble dried in real life.
- Scuff it. Rub the surface repeatedly with a fingernail and then with rough denim. Look for dulling, lifting or snagged thread.
- Check color in daylight. Compare it against the approved proof near a window, not under shop lights or on a phone screen.
Your Next Step
Send the same artwork file to two vendors and ask for a printed quote and an embroidered quote side by side. Request a digital proof on both, then run the sample routine on whichever one you lean toward.
Frequently Asked Questions
Can I iron a printed patch onto a jacket?
Yes, if the jacket fabric tolerates heat. Cover the patch with a pressing cloth, use the vendor's recommended temperature, and hold firm pressure instead of sliding the iron around.
Which is better for a baseball cap?
Embroidered patches suit structured caps because the stiffness holds the curve of the front panel. Printed patches sit better on flatter or softer panels, and curved fronts usually need stitching around the edge.
Can an embroidered patch show a photograph?
Only as a stitched interpretation with limited colors, which looks more like an illustration than a photo. For true photo detail, use a printed or print-plus-embroidery patch.
How can I tell if a patch is embroidered or printed?
Tilt it in the light. Embroidery shows thread direction and a raised texture, while print looks smooth with an even, flat finish. The back is another clue, since stitching is visible under the backing on an embroidered patch.
Does the garment fabric matter for a printed patch?
Not for the print itself, because the artwork is applied to the patch before it ever reaches your garment. What matters is whether the backing bonds to your fabric and whether the garment can take the heat.
Can I use both types on one jacket?
Yes. Keep the sizes, edge style and color tones consistent so they look like one set, and put the more detailed artwork on the printed piece.
How do I remove a patch without damaging the garment?
For sew-on patches, cut the stitches carefully with a seam ripper. For iron-on patches, warm the patch with a pressing cloth, peel it back gently, and clean off any leftover adhesive.
Are printed patches accepted on official or military uniforms?
Often not. Many organizations specify the patch type, thread colors and placement, so check your unit or agency's uniform guidelines before ordering anything.